Archive for April 2011

Saturday, April 30, 2011

design memory craft winners

Thanks for entering the Design Memory Craft Giveaway! The two lucky winners of these new Mix and Match kits are:

SS Travels
who said
"I like the blue/green gelatos!"


and

SewLindaAnn

who said
"Blue/Green would be my choice. Neat stuff. They had me at Gelato..and now I'm hungry!"


Congrats, ladies! I have emailed both of you, so check your inbox and get back to us!

share this on »
{Facebook} {Twitter} {Pinterest}
Add a comment

Friday, April 29, 2011

orzo salad with spicy buttermilk dressing

My friend recently mentioned to me that she has been disappointed not to see as many of my regular recipe posts. So Megan, this one's for you! I have been trying to find some yummy, light recipes to make for my family. When I got my Cooking Light magazine in the mail this month, I knew I had to try the Orzo Salad with Spicy Buttermilk Dressing. It was a big hit and I will definitely be making it again. I hope you enjoy it too!


Orzo Salad with Spicy Buttermilk Dressing

  • 1 cup uncooked orzo
  • 1 cup frozen whole-kernel corn, thawed and drained
  • 12 cherry tomatoes, quartered
  • 3 green onions, sliced
  • 1 (15-ounce) can black beans, rinsed and drained
  • 1/4 cup low-fat buttermilk
  • 3 tablespoons chopped fresh cilantro, divided
  • 3 tablespoons fresh lime juice
  • 2 tablespoons light sour cream
  • 2 tablespoons canola mayonnaise
  • 1 teaspoon chili powder
  • 1/2 teaspoon kosher salt
  • 1/4 teaspoon black pepper
  • 1/4 teaspoon ground red pepper
  • 2 garlic cloves, crushed
  • 1 peeled avocado, cut into 8 wedges
  • 1 tablespoon chopped fresh parsley

Preparation:
  • 1. Cook orzo according to package directions, omitting salt and fat. Drain and rinse; drain well. Place orzo, corn, and next 3 ingredients (through beans) in a large bowl; toss.
  • 2. Combine buttermilk, 2 tablespoons cilantro, and next 8 ingredients (through garlic) in a small bowl, stirring well with a whisk. Drizzle over orzo mixture; toss. Top with avocado; garnish with remaining cilantro and parsley.

share this on »
{Facebook} {Twitter} {Pinterest}
9 Comments

Thursday, April 28, 2011

mother's day gifts {deal updates}

It's just over a week until Mother's Day--do you have your gift ready? Or have you given your significant other the appropriate hints? Either way, here are a few deal updates you do not want to miss!

First, Flirty Aprons is currently offering 40% off their Marilyn-style aprons like the Sugar n' Spice one below that I bought myself (and subsequently blinged). And the rest of their aprons are 20% off! That's a sweet deal on beautiful and very well-made aprons that any mom is sure to appreciate! The code for the Marilyn style aprons is Marilyn40 and the code for the 20% off sale is 20M2011. The Flirty Aprons offers run through May 10, 2011.


Our friends at Tiny Prints are also offering a great discount right now. Get 15% off your entire order through May 3, 2011. That includes Mother's Day cards, graduation announcements (they didn't have anything near this cute when I graduated!), birthday cards, birth announcements--everything site wide. That's pretty huge! The code you need is SALE15. You can also get any 3 cards free when you sign up for a trial membership!


And of course you can't go wrong with a photo canvas, especially when it is FREE! Canvas People are still offering their 8x10 photo canvas for FREE or $50 off a larger size, but I honestly don't know how much longer this sale will go. I love mine--your mom will love hers, too!


If you'd rather make mom something special, don't miss our Mother's Day gift ideas page with lots of great handmade gift ideas!

share this on »
{Facebook} {Twitter} {Pinterest}
Add a comment

Wednesday, April 27, 2011

silhouette rhinestone pack winner {and one more day to save!}

I'm blogging from sunny St. George, Utah today and thoroughly enjoying a break from the rainy Seattle skies. What a perfect day to make someone else's day! We had an awesome response to our Silhouette machine and rhinestone starter kit giveaway! We hope you liked our monogrammed rhinestone apron and superhero cape. We're happy to announce that Silhouette has extended the amazing sale price to our readers through today, April 27th, in case you weren't our lucky winner! Just use this link and enter promo code LITTLEBIRDIE to get a killer deal on the Silhouette and Rhinestone starter pack!


And now to make someone's day! The Silhouette Rhinestone bundle goes to. . .

The Fife's who said...

I have two girls so we have a house full of things we can rhinestone, crowns, aprons, dress-ups.....

Congratulations! I bet you are jumping up and down right now. You better be! Shoot us an e-mail so we can get you set up with your new Silhouette machine!

Thanks to everyone who entered! Don't forget the awesome deals from Silhouette going on now with code LITTLEBIRDIE. Your husband could use a hint for Mother's Day!

share this on »
{Facebook} {Twitter} {Pinterest}
2 Comments

cupcake gift boxes {guest tutorial}

READ THE REST OF THIS POST -->>>» |

Ooh, we're so excited to share a dreamy project from Heidi at sewcraftcreate.com! These beautiful cupcake gift boxes look scrumptious! Check out this adorable project, then head over to Heidi's blog for more crafting inspiration, including the gorgeous spring blossoms she created here. She also has a sweet blog makeover giveaway going on now!


I have a hankerin' for cupcakes...not just any cupcakes!
cupcake gift boxes


share this on »
{Facebook} {Twitter} {Pinterest}
16 Comments

Tuesday, April 26, 2011

easy mother's day vase {tutorial}


We're sharing this quick and simple Mother's Day vase over at Make and Takes today. Wouldn't this be perfect for a Mother's Day brunch? I was even thinking a version of it would be cute centerpieces for a wedding reception, or a sweet Teacher's Appreciation week gift. I can't wait for the rain to stop so I can pick more wild flowers!


Mother's Day Mason Jar Vase Tutorial
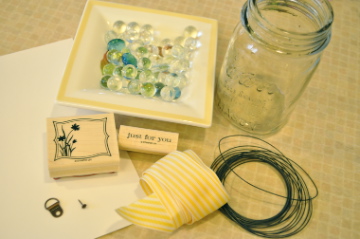

Supplies:
  • Small glass canning jar
  • 18″ of at least 24 gauge (or thicker) wire
  • 18″ piece of ribbon
  • clear glass marbles (optional)
  • Stamped tag and hanging hardware (optional)

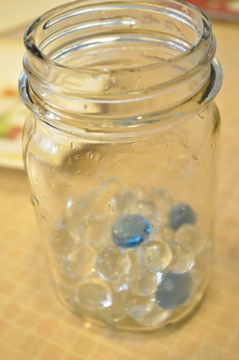
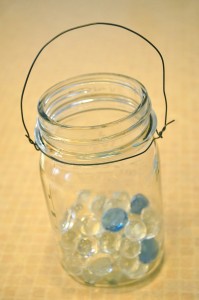
1. Fill your jar 1/3 full of glass marbles.


2. Cut a piece of crafting wire about 18″ long. Wrap it around the neck of the jar just below where you screw the ring on top. Twist the end around the longer piece to secure.

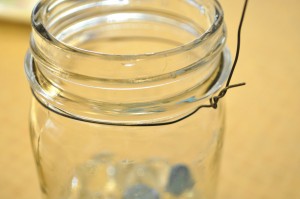
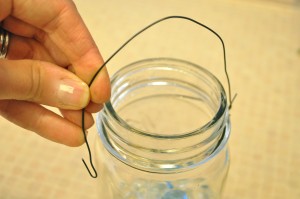
3. Create a handle with the remaining wire and loop it under the base on the opposite side. Twist to secure.


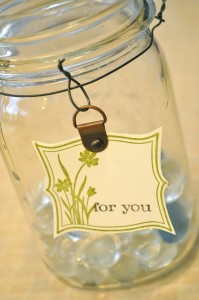
4. Hand stamp a tag: “just for you”, “thank you”, “Happy Mother’s day” etc. I used the "Just Believe" stamp set, the Old Olive Classic stamp pad, and the antique brass Hodgepodge Hardware set, all from Stampin' Up! I hung it on the wire with a hardware piece and another small piece of wire.

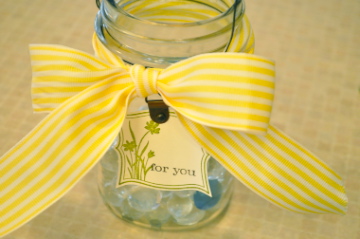
5. Tie a ribbon in a bow around the neck of the jar. This ribbon is the Daffodil Delight 1 1/4" striped grosgrain from Stampin' Up!

6. Fill with your favorite wild flowers!
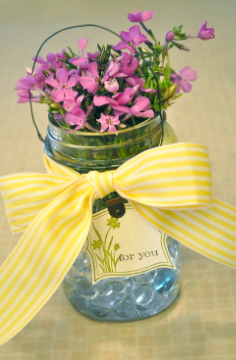
Happy Mother's Day!

share this on »
{Facebook} {Twitter} {Pinterest}
8 Comments

Monday, April 25, 2011

star studded little girls superhero cape {and last chance for the silhouette giveaway and discounts!}

Can you believe it's almost time to give away the Silhouette machine/rhinestone bundle? Thanks for all your awesome comments and ideas of stuff to "bling out!" I thought I'd show one more project before we pick our winner, just so you can see how fun these rhinestones are. We're still offering a special link for awesome deals on the Silhouette Rhinestone bundle, plus 30% off all rhinestone products through the 26th with coupon code and coupon code LITTLEBIRDIE!


I decided to make a superhero cape for one of the little girls I watch. She is a real firecracker, and this Rainbow Brite-esque fabric was just the thing for her. I chose a simple two-layer star shape from the Silhouette rhinestone CD included in the bundle and the 20ss clear rhinestones.

First I made the cape using this super easy pattern from Puking Pastilles. Then I cut my rhinestone shape on the Silhouette.


Next I used the brush and the Pick Up tool to place the rhinestones in the holes (see this post for more details).


After that I used the transfer tape to pick up my shape. . .


and place it in the middle of the cape.


Then I ironed it on and peeled off the transfer tape.


Wasn't that a cinch?


And my little superhero friend is ready to fight the evil powers of Murky Dismal (I can't be the only child of the 80s out there, right?).


Don't forget, our Silhouette machine with the Rhinestone starter kit giveaway ends Tuesday, April 26th at 11:59pm! Don't forget to enter--you too could be blinging out your world! And if you can't wait to see if you won, use this link to get your Silhouette Machine and Rhinestone starter kit for $229, or coupon code LITTLEBIRDIE to get 30% off the Rhinestone starter kit! and all other rhinestone products!

share this on »
{Facebook} {Twitter} {Pinterest}
7 Comments

design memory craft giveaway


Mix & Match from Faber-Castell Design Memory Craft makes designing with color simple. Choose a color set that inspires you. Choose a medium. Mix & Match as you create. Color coordinated palettes give you the freedom to design your project knowing the colors will work beautifully together. Perfect for all your design, memory and craft projects. I received two samples of these products to try out and they are amazing!

Mixed Media Sampler Sets in Red, Yellow, Blue and Green encourage you to spread your creative wings and experiment with mixing mediums! Each set includes a Stamper’s Big Brush, Gelato Metallic Stick, Pastel Pencil and Art GRIP Aquarelle Watercolor pencil. Experiment with mixing colors and mediums or layer different mediums to create depth and details. Or try using your rubber stamps with the different mediums to see which effects you like the most.


Color Gelatos are creamy sticks infused with brilliant color. The color slides easily onto papers and can then be dissolved with water to create watercolor effects, or left to dry for vibrant bursts of color. Try stamping with the Color Gelatos, or apply a field of color and use a stamp to remove the color. Color Gelatos work wonderfully on flocked papers and embellishments too! Color Gelatos are acid-free and odorless.


These new products really are so great and fun to experiment with! Today, two of our readers have the chance to win Mix and Match kits! Please visit the site and pick your favorite color. Then come back and tell us what kit you would want in what color. For a second entry you can become like us on facebook. Good Luck! This giveaway will end Friday, April 29th at 11:59 pm PT.

share this on »
{Facebook} {Twitter} {Pinterest}
118 Comments

Friday, April 22, 2011

fabric bookmark tutorial {teacher appreciation gift idea}


Today we are thrilled to be a part of Skip To My Lou's Teacher Appreciation roundup! What a fabulous group to be a part of (and what a fabulous blog to be featured on!). Be sure to hop on over to Skip To My Lou for tons of great teacher appreciation ideas from top craft bloggers! Here's what we're sharing there today. . .
fabric flowers bookmarks
Spring is trying to spring here in the Pacific Northwest, but it's not very successful. But I'm going to bring a little spring to my son's teacher during Teacher Appreciation Week in the form of a flower fabric bookmark. They're so super easy to make, and they're a great fabric stash buster!

Fabric Bookmark Tutorial for Teacher Appreciation Week


Supplies:

*Fabric cut to 4" x 8"
*Fusible interfacing cut to 3.75" x 7.75"
*Fabric strip for flower cut to about 1.25" x 42"
*Coordinating thread and sewing machine
*Fabric glue
*Coordinating button
*Needle and thread

1. Following manufacturer's instructions, iron fusible interfacing to wrong side of fabric piece.


2. Fold fabric piece in half width-wise, right sides together.


3. Sew across bottom edge and up side edge.


4. Clip corners and turn inside out. Use a pencil to gently push out corners.


5. Fold ends of open end in about 1/2".


6. Top stitch around all four sides, close to the edge, closing up open end.


7. Create a fabric rosette with your long strip of coordinating fabric and fabric glue (see tutorial here). Hand sew a button in the middle.


8. Glue the fabric flower to the top of the bookmark with fabric glue. That's it!


Thank you to all the teachers out there who put so much of their time and themselves into nurturing our children!

share this on »
{Facebook} {Twitter} {Pinterest}
20 Comments
LinkWithin Related Stories Widget for Blogs