
We are so pleased to be featured over at Handmade News. Check out our interview!
share this on » |
{Facebook} | {Twitter} | {Pinterest} |


We are so pleased to be featured over at Handmade News. Check out our interview!
share this on » |
{Facebook} | {Twitter} | {Pinterest} |

The lovely recipient of the butterfly quilt lives in one of the most beautiful cities in the world-Paris. So, I thought it would be fun to also make her a garland that she can use to announce to her friends and neighbors that the baby is here. A real fun "It's a Girl!" announcement--in a sophisticated French style. Here's what I came up with--beautiful French dresses on a satin ribbon. This simple garland would look perfect hanging on a chic Parisian door. (Well, at least I think so.)
I just used some white chipboard that came as packing material in a box. I hand sketched the dresses and then cut them out. I then traced the chipboard dresses onto coordinating cardstock. After the dresses where all cut out and ready; I embellished with ribbon, buttons, and my sewing machine.

This garland was so fun to make and I was able to do it in one evening. I love how they turned out and I think I am going to have to make about 50 more. Ooh la la!
share this on » |
{Facebook} | {Twitter} | {Pinterest} |

I love seam binding. It's a delicate ribbon that comes in hundreds of gorgeous shades. I just did a video tutorial for Lasting Memories that shows how to turn this pretty ribbon. . .
. . .into this vintage-looking ribbon. Isn't it stunning? Artists are selling it on Etsy, but it's really not that hard to make yourself.
I loved the way they package their seam binding over at this Etsy shop, so I copied it to give some of my ribbon away to a friend. If you don't want to make your own, this shop has some gorgeous options!
I love using it on cards, scrapbook pages, and projects with a vintage feel. So pretty!

A friend at work pointed out that even though she's not very good at tying bows, it doesn't matter with this stuff. It's very forgiving.
Here's my tutorial. Enjoy!
share this on » |
{Facebook} | {Twitter} | {Pinterest} |
Our wonderful friend, Debbie recently shared a great recipe that her husband loves. Stacy made it last week and had some ingredients left over. Being the fab friend that she is, she gave them to me so I could make the soup for my family too! It was absolutely delicious and we will definitely be making it again. Enjoy!
Thai Coconut Soup
¼ cup cilantro (fresh)
olive oil
1 leek (bottom part)
galangal (cut 3-4 round slices)
lemon grass, cut in half
lemon leaves
1 Tbsp. fresh ginger
Put all the above mentioned ingredients in saucepan and brown over medium heat until it gets light brown.
Then Add:
Canned coconut milk (shake first) – 1 can of coconut milk + 1 can full of water.
2 Tbsp. fish sauce
½ lime (squeeze the juice)
Palm sugar (to taste)
Shitake mushrooms
Boil everything gently for another 5 minutes.
Remove inedible pieces of lemon grass and galangal.
Add seafood as desired (for example: cod, shrimp, and scallops.)
Sprinkle with red pepper to get a kick (Stacy and I used some red curry paste instead and it was great!)
share this on » |
{Facebook} | {Twitter} | {Pinterest} |

Roar! Grumble! Gnaw!
The monster quilt is finished. Can't you hear them? My son is so happy he now has a new quilt to use. I am pretty happy with how it turned out too. Whaddaya think?
share this on » |
{Facebook} | {Twitter} | {Pinterest} |
We often get requests from readers for tutorials of specific projects. But recently we received pictures of a new project we hadn't tried yet. Instead of taking the time to try the project myself, I asked this reader if we could post her tutorial for our other readers. Then we got to thinking, why not make this a regular feature?
Each month we'd like to feature one reader's tutorial. Even if you're not a blogger yourself, we know you're still out there trying new craft projects all the time, just like us. So send them to us! Just a short write up and some accompanying pictures will do. We'll pick one reader each month to publish. And if you are a blogger, include a link to your blog and we'll make sure all our readers check it out!
Our first reader tutorial is by Bonnie Rains--a local friend in Seattle! I've seen these cool recycled crayons before (my preschooler got a heart-shaped one for Valentine's from a classmate--thanks Maddie!), but I'd never made them myself. Bonnie makes it sound even easier than I imagined! So without further ado, here's Bonnie!
Recycled Crayons Tutorial


share this on » |
{Facebook} | {Twitter} | {Pinterest} |
We have picked the two winners of the Bella's Books giveaway! The winners of a decorated journal/photo album that will be personalized are...
share this on » |
{Facebook} | {Twitter} | {Pinterest} |

I looooove the new "Dear Lizzy" line from American Crafts, designed by one of my favorite scrapbookers, Elizabeth Kartchner. This week I had the opportunity to demo fabric rosettes at the store, using her new fabric paper. Check out my video tutorial to learn how to make these pretty fabric flowers. Enjoy!
share this on » |
{Facebook} | {Twitter} | {Pinterest} |


share this on » |
{Facebook} | {Twitter} | {Pinterest} |
A few months ago when we had some friends over for an Asian dinner, our guests brought these delicious noodles. She had found a wonderful peanut sesame noodle recipe from Smitten Kitchen (love that site!) and altered it a bit. My husband and I were in heaven with this dish. We have since made it ourselves several times and it always hits the spot. I felt the need to share this wonderful recipe with you.
Instead of the tofu, peppers and cucumber listed in the recipe, we add snap peas, carrots and broccoli. The sauce is so delicious that you could probably add anything you want and it would taste amazing. Mmm, now I feel the need to go make some. Enjoy!
share this on » |
{Facebook} | {Twitter} | {Pinterest} |
share this on » |
{Facebook} | {Twitter} | {Pinterest} |
share this on » |
{Facebook} | {Twitter} | {Pinterest} |

I was suckered into doing another video tutorial for our flower demos at Lasting Memories last week. I only say that because my friend London somehow talked me into taking her place at the last minute. But I'm really happy to be able to share it with you! Here is a video showing how to make these beautiful paper roses that I've been using to decorate cards and the tops of gifts lately. I'm trying to will Spring here a little early with all these paper flowers I've been making. I think it's working--it was 65 degrees here on Monday! Wahoo!
share this on » |
{Facebook} | {Twitter} | {Pinterest} |
Thanks to everyone who entered our LilyLane Giveaway. Don't you just love their stuff? The winner of a $20 credit is...
share this on » |
{Facebook} | {Twitter} | {Pinterest} |
I am almost done with my monster quilt. Just need to bind it and I will have a final picture to show you all. It has been put on hold though for a while because I am now working on a quilt for an upcoming baby shower. This quilt was inspired by the Pottery Barn's butterfly wallies (paper wall decorations) and Stampin' Up's new butterfly die cut.
Here's a sneak peek:
share this on » |
{Facebook} | {Twitter} | {Pinterest} |
We have another great giveaway for you today! Bella's Books was created so each child could have a written memory of the people in their lives. Stephanie from Bella's Books told us, "Both of my daughters have one of these books, and friends and family have written memories in them, thoughts for the future and precious notes about today. Both of my girls love to listen to me as I read the words of love written to them by their grandparents, mommy and daddy, and friends. As new people come into the girls' lives we continue to pass the book around so others can express their feelings to our children. I have given these books as gifts, and people are using them in ways I never imagined; to write poetry, as journals, as photo albums, as yearbooks, and autograph books for their friends to sign, for birthday parties, and even by kids as sticker books. I've created custom guest books for weddings, bed & breakfasts, and visitor sign-in books for home. I'm sure there are many, many more uses for them, just use your imagination."


That sounds like a fabulous idea to me. What a special way to preserve memories. Today Bella's Books is offering a decorated journal/photo album that will be personalized to two of our readers! To enter this giveaway, visit Bella's Books and tell us your favorite style and who you would give it to if you win. Also be sure to check out their Facebook page. Bella's Books is also offering free shipping for our readers! Just use promo code LILBIRD when ordering. Good luck. We will choose the winners on Monday, March 22nd.
share this on » |
{Facebook} | {Twitter} | {Pinterest} |


share this on » |
{Facebook} | {Twitter} | {Pinterest} |
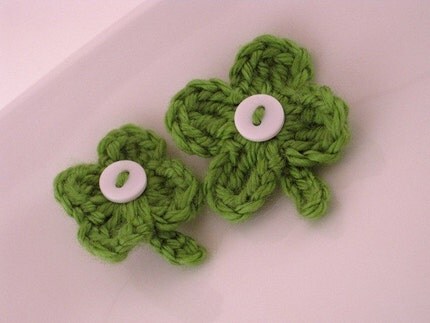
Crochet accessory designer Muranda Barker is one of my favorites on Etsy. She uses the most beautiful and interesting yarns to create cuffs, mini-scarves, hair accessories, hats, and more. I love the colors she chooses, too. And guess what? She's offering a $25 giveaway with us this week!
Here are some of my favorites from her shop:
love this one made from ribbon;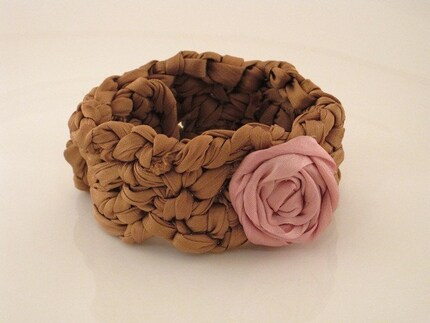
this cuff looks so soft and cozy;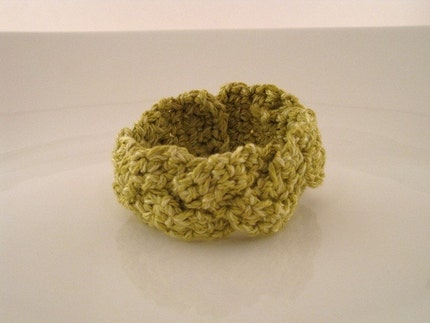
then there's this dino who's too cute to be scary;
I love the whimsical style of this mini-scarf;
and the one I seriously NEED in my wardrobe (love this color this season).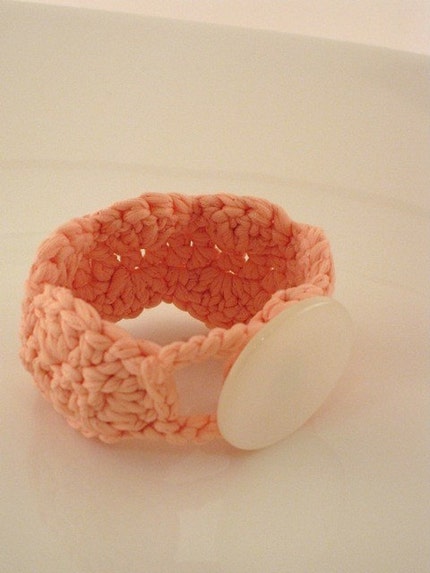
Muranda takes custom orders, and she's happy to make any of the items (sold or unsold) in many different colors. Just convo her!
So, do you want to win something from this fabulous crochet artist? Visit the {mur}made etsy shop (isn't that the cutest name?) and leave us a comment telling us which of Muranda's creations you want most for a chance to win a $25 gift certificate. We'll pick our winner next week, so be sure to leave your comment by Wednesday, March 17th at 11:59pm PT. Luck of the Irish to ya!
share this on » |
{Facebook} | {Twitter} | {Pinterest} |

A banner is like a newspaper headline. It immediately shouts a message using the fewest words possible. It often makes you feel something. It can be powerful. I love Ali Edwards' "One Little Word" concept, where you pick a word each year that you want to focus on. My boss Jennifer introduced me to making paper/chipboard banners, and she makes one every year with her "one little word." Since this last year has been challenging for me, I decided my one little word this year would be "joy," and what better way to remember it than to make a "joy" banner!
As a Design Team member at Lasting Memories, I get packets of new products to make samples for store displays. When I got this product from Little Yellow Bicycle's new Fresh Linen line, I jumped for joy! When I get it back I'm going to hang it where I can see it everyday, so I'll remember to find joy in the little things--in being myself, in creating, in watching my children experience the world, in new opportunities, in overcoming, in dancing, laughing, and loving the people around me.
If you haven't made a banner before, this is a fun project. I'm actually a little obsessed with them. I made this one for a loved one with breast cancer,
and I'm taking a class to make this "Eat Cake" banner for all the birthdays and other celebrations in our little family. I love banners!
So even though this isn't a tutorial, here are some "banner basics" if you're a beginning banner maker.
1. Choose a word or phrase that will get your meaning across but still be functional. Short words are nice if you don't want your banner to be 10 feet long. "Eat Cake" is great because it can be used for any celebration, not just birthdays.
2. Decide how sturdy you want your banner to be. For a one-time event, I would probably just use heavy card stock and patterned paper. For a banner I intend to re-use, I back my pieces with chipboard. Try your local scrapbook store's die cut center for pennant shapes. I also often use other shapes like coasters, mini album pages, and hearts (remember this mini banner?).
3. Cut letters with a die cut machine, or print them in an "outline" font and cut them out. Or use large alphabet stickers or chipboard letters. It's fun to pop them up with dimensional pop dots.
4. Jennifer taught me to use coordinating paper and embellishment lines for fast and easy banners. Scrapbooking brands like Cosmo Cricket have lines that include several papers, chipboard accents, and even buttons that all match. "It practically makes itself," she says.
5. Don't be afraid to make it 3-D! I love adding chunky accents, ribbon, and popped-up letters to my banners. They're not going in an envelope or page protector, so no need to keep them skinny!
Here are a few examples of pennants from Jennifer's "Barnhart" banner she made for a family reunion last year. Adorable!


Check out this post for more great banner ideas!
share this on » |
{Facebook} | {Twitter} | {Pinterest} |
We are guest posting over at Make and Takes today. Here is a sneak peek of our project. Go check it out!
share this on » |
{Facebook} | {Twitter} | {Pinterest} |
Meet LilyLane. LilyLane was created by Anna and Sarah, fellow stay-at-home moms. They said they created LilyLane as a way of not only gaining extra financial support—their husbands are on a long road of graduate school—but also as an opportunity to use some bottled up creative juices and create a product line of jewelry that will be a classic keepsake for years to come. How great is that?
They have such beautiful jewelry. Each pendant is a one-of-a-kind custom designed piece. I love that you can have a photo pendant of your children to wear around! There are so many beautiful options. Here are some of my favorites.


LilyLane is generously offering one of our readers the chance to win a $20 credit to LilyLane. All you have to do is visit LilyLane and find your favorite item that you would want to get with your credit. Then come back and tell us what it is in a comment. The giveaway will end Sunday, March 14th at 11:59 pm PDT. Good luck!
share this on » |
{Facebook} | {Twitter} | {Pinterest} |
In case you missed my fan-fold flower demo on Saturday, here's a video tutorial. I feel so awkward being on camera, but it's for a good cause, right? You all need to know how to make these flowers! Check the Lasting Memories blog this week to see what flower we'll be demonstrating this Saturday for you Seattle area locals.
There's also another AMAZING demo and make 'n take going on in the store that day. Making Memories will be there to do a FREE make 'n take--you'll get to make something with the Slice AND a jewelry project using their new Vintage Groove jewelry line! Two free make 'n takes in a half hour mini class--that's incredible. All you have to do is call the store to sign up for a time (425-670-3721). I'll be there--not working, but taking classes and doing the demo, so come join me for some crafty goodness!
Okay, now for the video. Enjoy!
share this on » |
{Facebook} | {Twitter} | {Pinterest} |

The kids are celebrating Dr. Suess everyday this next week at school with each day having a fun theme. Monday is "Crazy Hat Day" so I decided to whip up a hat using another hat we had around the house as my template. I documented the steps I took when making this hat in case any of you also need a hat for an upcoming "Crazy Hat Day".
You will need:
3 strips of red felt 3 inches by 21 1/2 inches
2 strips of white felt 3 inches by 21 1/2 inches
One red circle of felt that is approximately 7 3/4 inches in diameter
One white circle ring that is 12 inches in diameter to the outer side of the ring and 3 inches wide
Allright, here is what I did. First, sew your red and white felt strips together. I used my serger. Sew with a 1/4 inch seam if you are doing it on a sewing machine.
Next, fold the sewn strips right sides together and stitch down one side to make a tube.
Next, pin your red 7 3/4 inch in diameter circle to one side of your tube. 

Sew or serge it on. Now, pull your hat right side out so all the seams are inside. Now, cut out and pin your ring of white felt. You will notice the hole is 9 inches in diameter and the outer part of the ring is 12 inches in diameter. Pin this ring to the outside of the hat.

When your rim is on you are done.
share this on » |
{Facebook} | {Twitter} | {Pinterest} |


